
You’ve just got a shiny new MacBook Neo and you’re keen to see what it can do. But before you go racing off to browse the internet or play some games, there are a few things it’s worth doing first.
Here, we’ll show you 7 of the best changes you can make to your Mac, from strengthening your privacy to customizing it to your liking. These quick fixes and adjustments will make all the difference to your macOS experience, and these tips are great for anyone new to macOS, no matter what Mac or MacBook you have.


Secure your Mac
(Image credit: Apple)
The last thing you want to happen to your new Mac is for it to be compromised. Luckily, privacy and security are two of Apple’s core strengths, and macOS is well equipped to keep your digital life safe and sound.
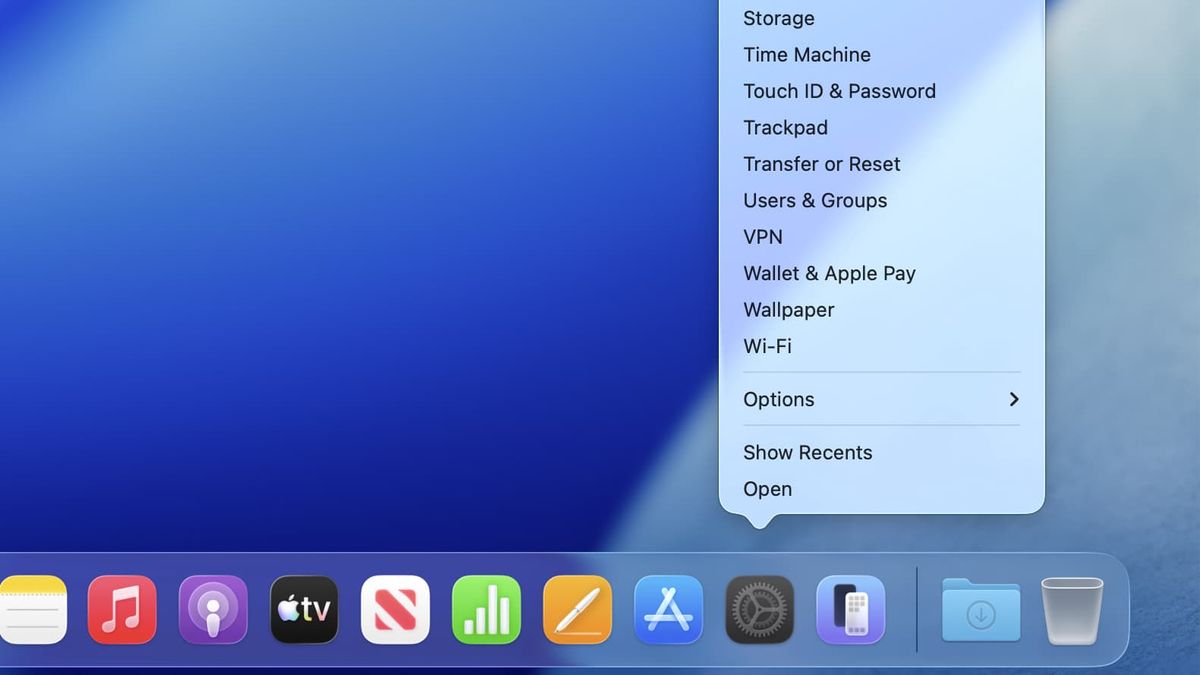
First, you’ll want to enable automatic updates to ensure your Mac always has the latest security patches and new features. To do so, open the System Settings app and head to General > Software Update in the left-hand sidebar. From there, click the i button next to Automatic Updates and switch all the toggles on.
While the entry-level MacBook Neo lacks Touch ID, the more expensive model comes with Apple’s fingerprint recognition system. To register your fingerprint with macOS, go to the Touch ID & Password section of the System Settings app and click Add Fingerprint, then follow the instructions.
If your MacBook Neo model doesn’t have Touch ID, you can still protect your login details with Apple’s Passwords app. This is the free, built-in password manager that comes with macOS, and you’ll find it in your Mac’s Applications folder accessed using the Finder. Just open it up and follow the on-screen instructions. Make sure you click Passwords > Get Browser Extension in the app’s menu bar to install it in your favorite web browser. That way, you can save and fill passwords on the web without needing to leave your browser.
It’s also a good idea to turn on FileVault. This encrypts your files so that even if you lose your laptop, no one else can access your private documents and information. To set it up, open System Settings and go to Privacy & Security > FileVault in the sidebar, then enable the toggle to start protecting your files. Just make sure you write down your Mac’s password so you don’t get locked out. Your Recovery Key is also synced to every Apple device you own with iCloud Keychain enabled.
All about apps

(Image credit: Apple)
While iOS is very restrictive about where you get your apps (although that’s beginning to change), Mac users have long been able to install apps from anywhere they like. But in order to do that, you’ve got to change a simple setting first.
Go to the Privacy & Security section of the System Settings app, then scroll to the bottom of the page. Under the Security header, you’ll see ‘Allow applications from.’ Click the pop-up menu and select App Store & Known Developers. This gives you wider access to apps from outside the App Store while maintaining the security of your device.
Once you’ve installed a few new apps, it’s a good idea to change which ones are used to open certain files. After all, you might not always want videos to open using QuickTime, for example. There are a few ways to change your default apps.
Firstly, let’s say you want to change the app that’s used to open JPG images. Right-click a JPG file, click Get Info, then expand the Open with section and pick an app from the pop-up menu. Click Change All to make sure every JPG file opens with this app rather than just the one you selected.
To switch to a different default web browser, open System Settings, click Desktop & Dock in the sidebar, then scroll down to the Widgets section. There, next to ‘Default web browser,’ click the pop-up menu and pick a new app.
Finally, you can change your default email client by opening the Mail app and clicking Mail > Settings in the menu bar. Now click the General tab and choose a new app from the ‘Default email reader’ pop-up menu at the top of the page.
Customize your Dock
(Image credit: Future)
The macOS Dock permanently houses all your favorite apps, shows recently opened apps, and has spots for downloaded items and the trash. It’s a pretty powerful tool when you know how to use it.
To rearrange app icons in the Dock, just drag them to a new position. You can add new apps by dragging them onto the Dock and remove apps by dragging them out until the word Remove appears, then letting go.
By default, the Dock shows recent apps on the right-hand side. That can be handy, but can also clutter the Dock. To change this, open System Settings and navigate to Desktop & Dock in the sidebar, then disable the toggle next to ‘Show suggested and recent apps in Dock.’
You can also hide the Dock itself by adjusting the ‘Automatically hide and show the Dock’ toggle. It disappears by default and will reappear if you move your mouse pointer to the bottom of your Mac’s screen.
Finally, Apple’s standard configuration has apps use a ‘Genie’ effect when they’re minimized. This sucks them down into the Dock at an angle, but it’s not to everyone’s taste. If you don’t like it, change Genie Effect to Scale Effect next to ‘Minimized window animation’ in the same System Settings window.
I’ve written about the Dock in more detail, including highlighting some clever tricks to help you get even more out of it. Check that guide out if you want to learn a bit more about this macOS feature.
Set up Time Machine
If anything was to go wrong with your Mac, you don’t want to find out you’ve lost all your files. One way you can prevent that is by using Time Machine to back up your Mac. For this, you’ll need an external storage drive with enough space to hold your Mac’s files.
Now, ensure your drive is connected to your Mac, then open System Settings and go to General > Time Machine > Add Backup Disk. Choose your external drive from the list and click Set Up Disk. Once you’ve followed the on-screen instructions, you should be good to go. Your Mac will now automatically back up as long as your drive is connected.
Make full use of your trackpad
(Image credit: Apple)
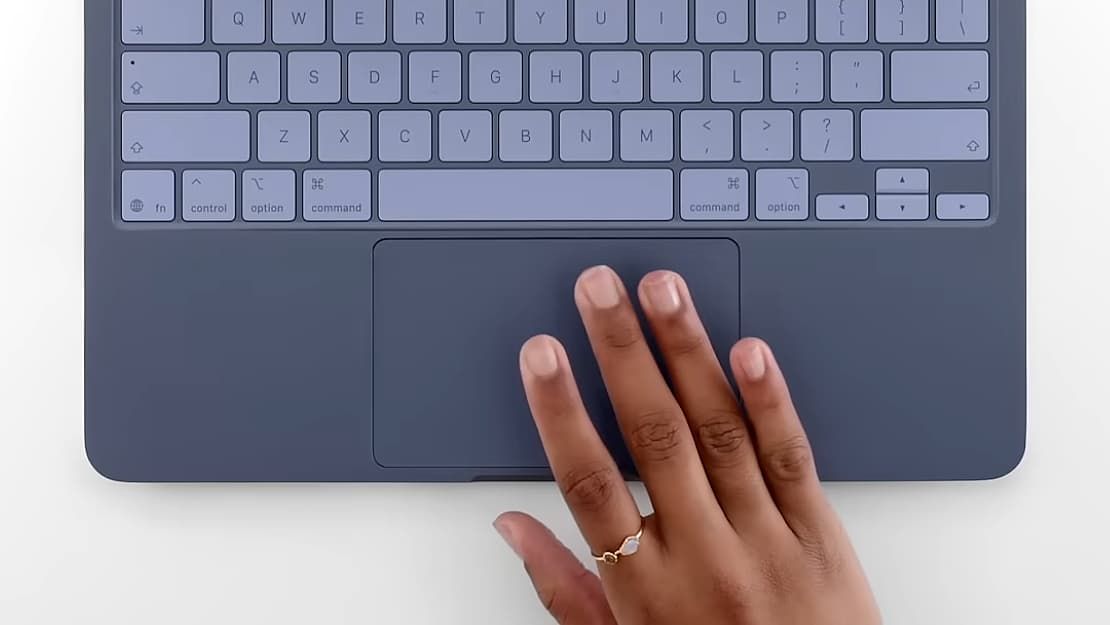
Apple’s MacBook trackpads are some of the best in the business, and even though the MacBook Neo doesn’t use a Force Touch trackpad, its offering is still incredibly well refined. You’ll find a range of intuitive gestures are enabled by default, like pinching your fingers together to open the Applications pane or moving four fingers upwards to show all your open app windows.
But you can unlock extra trackpad gestures that are hidden in your Mac’s settings. The first one can be found in System Settings by scrolling to the bottom of the sidebar and clicking Trackpad. From there, click More Gestures, then click the pop-up menu next to App Exposé and choose a gesture. App Exposé shows all the open windows of just the foremost app – rather than those of all currently open apps – allowing you to quickly flick between them.
The second secret gesture relates to dragging and dropping files. Sometimes, you might find you run out of space on your trackpad when moving a file. But if you go to System Settings > Accessibility > Pointer Control > Trackpad Options, you’ll find some handy ways to fix that. At the bottom, enable the toggle next to ‘Use trackpad for dragging,’ then pick one of the options from the pop-up menu. These choices let you do things like let go of the trackpad to reposition your fingers as you move a file, all without dropping it, making the process a lot easier.
Keep your battery going for longer
The better you look after your MacBook Neo’s battery, the longer it’ll serve you. Apple’s laptop batteries are already some of the most effective in the industry, but a few quick tweaks could help you get even more out of them.
The first thing to do is head to System Settings > Battery. Next to Charging, click the i button, then enable Optimized Battery Charging. This learns your daily usage routine and charges at optimal times to prevent overcharging.
Back in the Battery section, scroll to the bottom and click Options, then enable ‘Slightly dim the display on battery’ to make sure your screen isn’t eating into your battery too much while you’re not using a charger.
If you really want to eke as much juice out of your laptop as you can, click the pop-up menu next to Low Power Mode and select a scenario. This disables certain features to prolong your battery as much as possible.
Tune up your display
(Image credit: Apple)
MacBooks have beautiful displays, and the MacBook Neo is no different. A few little changes here and there, though, can make it even better.
If you tend to use your laptop at night, you know how painful it can be to have your eyes blasted by a bright screen. To put that right, go to System Settings > Displays > Night Shift, then click the pop-up menu next to Schedule. Night Shift automatically changes your screen’s color temperature, which helps ease the strain on your eyes. You can either set up a custom schedule or use Apple’s Sunset to Sunrise option.
Back on the Displays pane, enable the toggle next to ‘Automatically adjust brightness.’ As the name suggests, this detects the brightness of your surroundings, then changes your display to match. It can help ensure your screen is never too bright or too dark for your needs.
Follow TechRadar on Google News and add us as a preferred source to get our expert news, reviews, and opinion in your feeds. Make sure to click the Follow button!
And of course you can also follow TechRadar on TikTok for news, reviews, unboxings in video form, and get regular updates from us on WhatsApp too.
Today’s best Apple MacBook Neo deals

![]()
To read more about enhancing your MacBook Neo experience, check out the article Here.
Image Credit: www.techradar.com


